VPS翻墙屡屡被封?这里分享一个一键脚本实现V2Ray 基于 Nginx 的 vmess+ws+tls来拯救你的VPS。
一、准备工作
首先要有一台国外VPS,这里推荐使用Vultr,支持支付宝。
之后需要一个域名,可以付费购买(推荐Namesilo),也可以在Freenom申请一个免费域名(申请教程),之后解析到你的VPS IP上。
二、一键脚本使用方式
脚本适用于:Debian 9+ / Ubuntu 18.04+ / Centos7+
两个安装方式(不兼容,二选一)
1.Vmess+websocket+TLS+Nginx+Website
- bash <(curl –L –s https://raw.githubusercontent.com/wulabing/V2Ray_ws-tls_bash_onekey/master/install.sh) | tee v2ray_ins.log
2.Vmess + HTTP2 over TLS
- bash <(curl –L –s https://raw.githubusercontent.com/wulabing/V2Ray_ws-tls_bash_onekey/master/install_h2.sh) | tee v2ray_ins_h2.log
安装/更新方式(Nginx 前置)
支持配置方式
- VLESS + TCP + TLS + Nginx + WebSocket
wget -N --no-check-certificate -q -O install.sh "https://raw.githubusercontent.com/wulabing/Xray_onekey/nginx_forward/install.sh" && chmod +x install.sh && bash install.sh
安装/更新方式(Xray 前置)
支持配置方式
-
VLESS + TCP + XTLS / TLS + Nginx
-
VLESS + TCP + XTLS / TLS + Nginx 及 VLESS + TCP + TLS + Nginx + WebSocket 回落并存模式
wget -N --no-check-certificate -q -O install.sh "https://raw.githubusercontent.com/wulabing/Xray_onekey/main/install.sh" && chmod +x install.sh && bash install.sh
注意事项
- 如果你不了解脚本中各项设置的具体含义,除域名外,请使用脚本提供的默认值;
- 使用本脚本需要你拥有 Linux 基础及使用经验,了解计算机网络部分知识,计算机基础操作;
- 目前支持 Debian 9+ / Ubuntu 18.04+ / Centos7+ / Oracle Linux 7+;
安装成功后如下所示:
脚本启动方式
启动 V2ray:systemctl start v2ray
停止 V2ray:systemctl stop v2ray
启动 Nginx:systemctl start nginx
停止 Nginx:systemctl stop nginx
脚本相关目录
Web 目录:/home/wwwroot/levis
V2ray 服务端配置:/etc/v2ray/config.json
V2ray 客户端配置: 执行安装时所在目录下的 v2ray_info.txt
Nginx 目录: /etc/nginx
证书目录: /data/v2ray.key 和 /data/v2ray.crt
下载Windows客户端:v2rayN
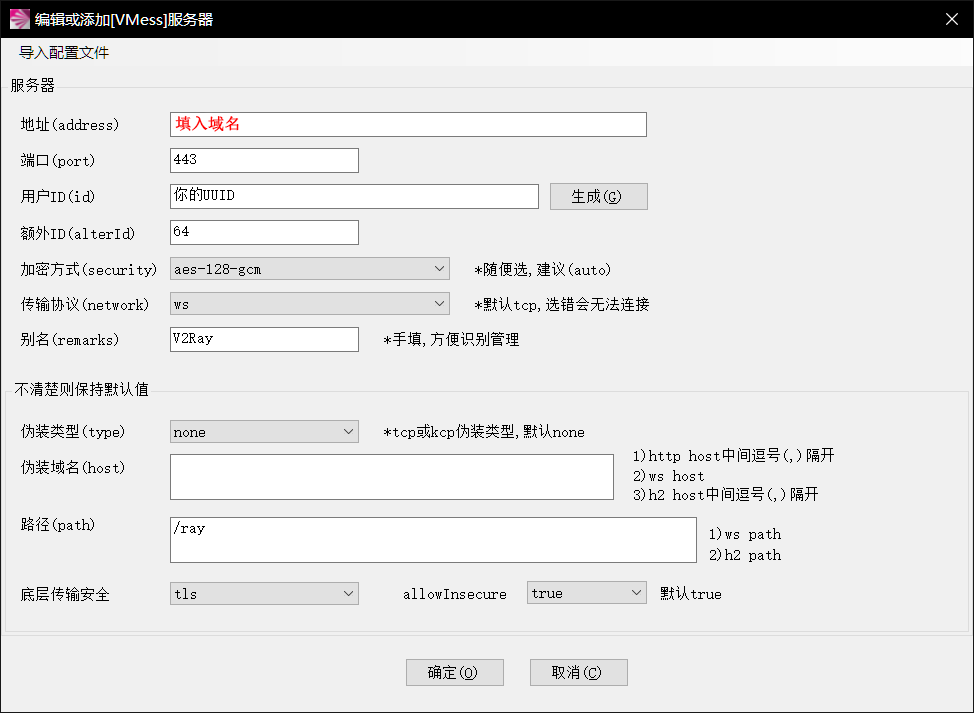
打开软件,点击:服务器→添加[VMess]服务器:
填上你设置的对应数据,如服务器ip、端口、UUID(服务端和客户端必须一致),加密方式一般为aes-128-gcm,协议为ws,伪装域名留空,路径为/ray,开启tls和不安全传输,设置完保存。
右键V2RayN的系统栏小图标,点击启用Http代理,Http代理模式选择第二个PAC模式,最后再打开V2RayN软件面板,在检查更新里选择更新PAC。
到此,V2Ray就全部配置完成了。
原文:一键脚本安装V2Ray+WebSocket+TLS+Nginx救活被墙VPS


